 Admin
Admin
When you hear the phrase kitchen island with stove, you might picture a sleek, modern centerpiece that blends cooking, prep, and socializing into one seamless hub. This concept is rapidly gaining traction among homeowners and designers alike because it maximizes workflow efficiency while adding visual drama to the heart of the home. Integrating a stove directly into an island reshapes the traditional kitchen triangle, creates a natural gathering spot, and often elevates the overall resale value of the property.
However, the decision to embed a cooking surface into an island is far from a simple aesthetic choice. It involves careful planning around ventilation, clearances, material durability, and ergonomic layout. In this article we dive deep into every facet of the kitchen island with stove—from the psychological benefits of a central cooking station to the nitty‑gritty of code compliance and budget management. By the end, you’ll have an authoritative roadmap for turning this bold idea into a functional reality that serves both daily meals and entertaining moments.
Whether you are renovating a compact apartment kitchen or upgrading a spacious suburban home, the principles outlined here will help you assess whether an island stove aligns with your lifestyle, and if so, how to execute the design with confidence and precision.
Why a Kitchen Island With Stove Is a Game‑Changer
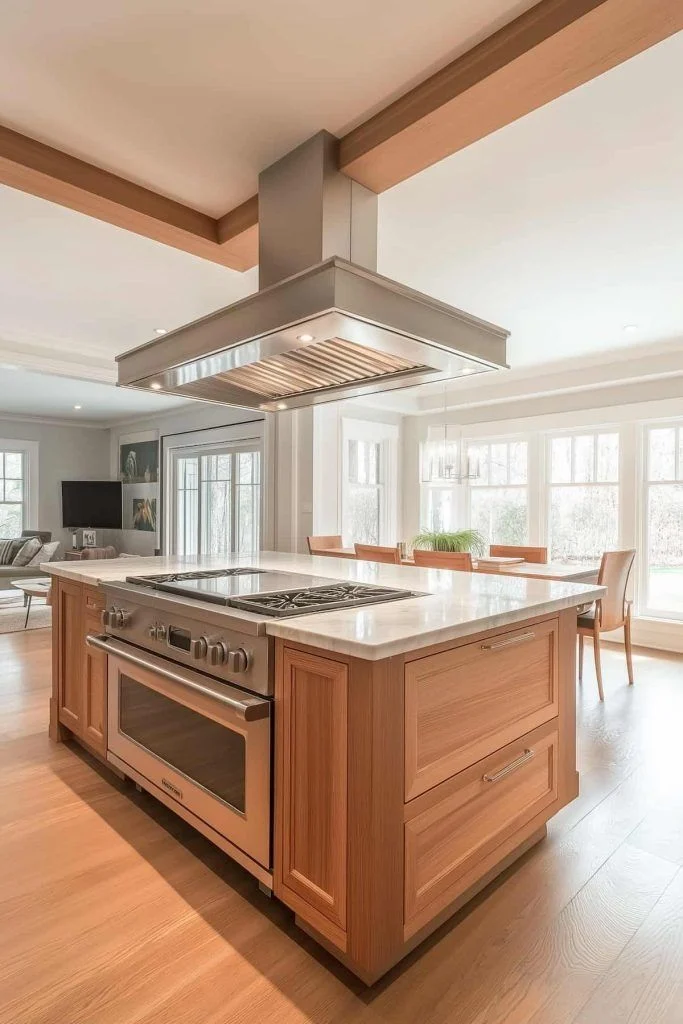
Traditional kitchens often separate cooking, cleaning, and storage into distinct zones, forcing the cook to shuttle back and forth. By moving the stove onto an island, you create a unified work zone that dramatically reduces movement, shortens cooking times, and improves safety. The following benefits illustrate why this configuration has become a hallmark of contemporary kitchen design.
Enhanced Workflow Efficiency
- With the stove centrally located, you can prep ingredients on one side of the island and move directly to the burners without crossing traffic lanes.
- Integrated drawers and cabinets beneath the stove provide immediate access to pots, pans, and utensils, eliminating the need to reach across the room.
- The island’s perimeter offers ample countertop space on either side, supporting multiple tasks simultaneously—think chopping, mixing, and plating in a linear flow.
Social Hub and Visual Anchor
- The island stove naturally draws family and guests into the cooking process, fostering conversation and shared experiences.
- It serves as a visual focal point, allowing designers to experiment with dramatic finishes, such as a brushed stainless steel range or a bold, colored countertop.
- Seating at the island’s perimeter enables diners to watch the culinary action, turning meal prep into an entertaining performance.
Increased Home Value
Real estate data consistently shows that homes featuring a kitchen island—especially one with a built‑in stove—command higher resale prices. Buyers associate this layout with luxury, functionality, and modern living, making it a compelling selling point during market negotiations.
Design Considerations and Layout Options

Before committing to a kitchen island with stove, you must evaluate spatial constraints, traffic patterns, and the overall aesthetic you aim to achieve. Below are the most common layout scenarios and the design principles that guide them.
Island Size and Clearance
- Standard code requires a minimum of 42 inches of clearance on all sides of a cooking surface to allow safe opening of oven doors and access to controls.
- For islands, a width of 36–48 inches provides sufficient countertop space on each side while maintaining a comfortable working width of 24–30 inches for the stovetop itself.
- Consider a “double‑sided” island where the stove is centered and the countertop extends equally on both sides, supporting a seamless flow for both the cook and guests.
Open‑Plan vs. Enclosed Kitchens
In open‑plan homes, the island stove can become a natural boundary between cooking and living areas. However, you must address ventilation carefully to prevent smoke and odors from drifting into adjacent spaces. In enclosed kitchens, you have more flexibility with traditional hood installations, but you still need to ensure the island does not obstruct the required 30‑inch clearance above the stovetop.
Seating Configurations
When incorporating seating, allow at least 24 inches of width per stool and maintain a 12‑inch buffer between the edge of the countertop and the back of the seating area. This ensures comfort while preserving enough room for the cook to move freely.
Choosing the Right Cooking Appliance

The heart of any island stove is the cooking appliance itself. Selecting the appropriate unit involves balancing performance, size, fuel type, and aesthetic harmony with the surrounding cabinetry.
Fuel Options: Gas, Electric, or Induction
- Gas offers immediate heat control and is favored by professional chefs. It requires a gas line and proper venting, but modern low‑NOx burners mitigate environmental concerns.
- Electric ranges provide even heating and are easier to clean, though they may lack the rapid responsiveness of gas.
- Induction combines the precision of gas with the safety of electric, using magnetic fields to heat cookware directly. It demands compatible cookware but delivers energy efficiency and fast temperature changes.
Size and Configuration
Standard residential stoves come in 30‑inch, 36‑inch, and 48‑inch widths. For island installations, 36‑inch models strike a balance between capacity and space efficiency. If you entertain frequently, a 48‑inch dual‑fuel range (gas burners on top, electric oven below) provides maximum flexibility.
Integrated vs. Separate Units
Some designers opt for a built‑in cooktop paired with a separate wall oven, allowing the island to remain open for additional storage. This arrangement can create a cleaner visual line and simplify venting, especially when using downdraft ventilation (discussed later).
Ventilation and Safety: Non‑Negotiable Essentials

Any cooking surface that emits heat, steam, or smoke demands robust ventilation. Improper venting can lead to lingering odors, excess humidity, and even fire hazards. Below are the primary ventilation strategies for an island stove.
Downdraft Ventilation Systems
- Downdraft vents are installed directly beneath the cooktop, pulling smoke and steam down into a concealed duct that exits through the floor or an exterior wall.
- While aesthetically pleasing—no overhead hood to obstruct sightlines—they typically require a minimum 24‑inch clearance beneath the stove to accommodate the vent’s blower and ductwork.
- Performance varies; high‑capacity downdraft units can rival traditional hoods, but they may be noisier and more expensive.
Overhead Hoods with Island Mounts
- Island‑mounted hoods hang from the ceiling and draw air upward. They offer superior capture rates for high‑heat cooking and are available in a range of styles, from sleek stainless steel to decorative brass.
- Installation requires a sturdy ceiling support system and careful coordination with the home’s HVAC to ensure proper makeup air supply.
Fire Safety Measures
Beyond ventilation, you must adhere to clearance codes: at least 30 inches of vertical space above the stovetop and a minimum of 6 inches of combustible‑free material around the sides. Installing a fire‑suppression system—especially for gas ranges—adds an extra layer of protection and may lower homeowner’s insurance premiums.
Materials and Finishes: Marrying Durability with Style
The choice of countertop material around the stove is critical, as it must withstand high heat, spills, and frequent cleaning. Below are the most popular options, each with its own performance profile.
Quartz
- Engineered quartz offers non‑porous surfaces resistant to stains, scratches, and heat (up to 350°F). It’s low maintenance and comes in a vast array of colors, making it ideal for seamless island designs.
- While quartz tolerates typical stovetop temperatures, a protective trivet or heat‑resistant pad is recommended for direct pot placement.
Granite
- Natural granite provides excellent heat resistance and a unique speckled aesthetic. It requires periodic sealing to maintain its resistance to stains.
- Heavy weight may necessitate reinforced island framing, especially for larger spans.
Solid Surface (e.g., Corian)
- Solid surface materials are seamless and can be molded to incorporate integrated sinks. However, they are less heat‑resistant than quartz or granite and can scorch if a hot pan is placed directly on the surface.
Butcher Block
- Wooden countertops add warmth and a rustic vibe, but they are vulnerable to heat damage and require regular oiling. If you love the look, consider a heat‑resistant metal or stone insert beneath the stovetop.
For a cohesive design, coordinate the island’s countertop with the surrounding cabinets. If you’re already using oak cabinets, a quartz countertop with subtle gray veining can create a sophisticated contrast. For inspiration on pairing countertops with oak cabinetry, see our guide on countertops with oak cabinets.
Installation and Cost Considerations
Building a kitchen island with a stove is a multi‑disciplinary project that involves cabinetry, electrical, plumbing, and HVAC professionals. Understanding the cost drivers helps you set realistic expectations and avoid budget overruns.
Structural Reinforcement
Stoves are heavy, especially when combined with a built‑in oven. The island base must be engineered with reinforced joists and cross‑bracing to support the weight. This may add $500‑$1,200 to the overall cost, depending on the span and materials used.
Utility Routing
- Gas lines must be installed by a licensed plumber, with pressure testing to ensure safety. Expect $300‑$800 for a new line.
- Electrical work for an induction or electric stove typically requires a dedicated 240‑volt circuit, costing $150‑$400.
- Ventilation ducts for downdraft or overhead hoods can add $400‑$1,000, especially if they need to travel a long distance.
Appliance Cost
High‑end gas ranges start around $2,000, while premium induction cooktops can exceed $4,000. Pairing the stove with a wall oven or built‑in microwave will increase the total appliance budget.
Labor and Finishing Touches
Professional installation typically runs $2,500‑$5,000, covering cabinet fabrication, countertop installation, and finishing details such as trim, backsplash, and lighting. Choosing custom cabinetry or unique finishes will increase labor time and cost.
Maintenance, Longevity, and Everyday Use
A well‑designed island stove can serve you for decades, but routine care is essential to preserve both performance and aesthetics.
Cleaning the Cooktop
- For gas burners, remove grates weekly and clean with a non‑abrasive cleaner to prevent carbon buildup.
- Induction and electric glass surfaces benefit from a daily wipe with a soft cloth and a mild ceramic cleaner to avoid streaks.
- Always allow the surface to cool before applying any cleaning solution.
Countertop Care
Sealed stone surfaces should be resealed every 12‑18 months. Use coasters and trivets to protect the countertop from direct heat and moisture.
Ventilation Maintenance
Filters in downdraft or overhead hoods must be cleaned or replaced according to the manufacturer’s schedule—usually every 3‑6 months. A clogged filter reduces efficiency and can cause excess heat buildup.
Long‑Term Durability
When built with proper structural support and high‑quality materials, an island with a stove can withstand heavy daily use without warping or sagging. Periodic inspection of the support frame, especially after major renovations or after adding extra weight (e.g., a heavy marble countertop), will catch potential issues early.
Integrating the Island Stove into a Cohesive Kitchen Narrative
Beyond the functional aspects, the island stove should align with the overall design story of your kitchen. Whether you lean toward a minimalist Scandinavian aesthetic, a warm farmhouse feel, or a bold industrial vibe, the island can be the linchpin that ties every element together.
Color and Texture Harmony
- Pair a matte black stainless steel range with light‑colored quartz for a high‑contrast look.
- Use natural wood accents—such as a butcher‑block edge or reclaimed timber paneling—to soften the industrial edge of metal appliances.
- Incorporate metallic hardware that echoes the stove’s finish, creating visual continuity.
Lighting Strategies
Layered lighting enhances both functionality and ambience. Install recessed LED downlights above the island, pendant fixtures on either side for task illumination, and under‑cabinet LEDs to highlight the countertop while cooking.
Complementary Furniture and Décor
Even though the focus is on the kitchen, adjacent living spaces benefit from cohesive design. For instance, a sleek kitchen island can be visually linked to a living‑room seating area through shared material palettes. Discover how a design philosophy that balances form and function can elevate both rooms.
Personal Touches
Consider adding a built‑in spice rack, a pull‑out cutting board, or integrated USB charging ports on the island’s side. These small conveniences enhance daily usability and reinforce the island’s role as the kitchen’s command center.
By thoughtfully addressing layout, appliance selection, ventilation, materials, and aesthetic coherence, a kitchen island with stove becomes more than a trendy feature—it turns into a durable, efficient, and socially engaging centerpiece that enriches everyday living.
Embarking on this project may seem daunting, but with the right planning and professional guidance, you can create a kitchen that not only meets practical cooking needs but also reflects your personal style. Remember that each decision—from the type of stovetop to the finish of the countertop—has a ripple effect on the overall experience. Take the time to evaluate your cooking habits, entertain aspirations, and budget constraints, and you’ll find that the island stove is an investment that pays dividends in both convenience and home value for years to come.
