 Admin
Admin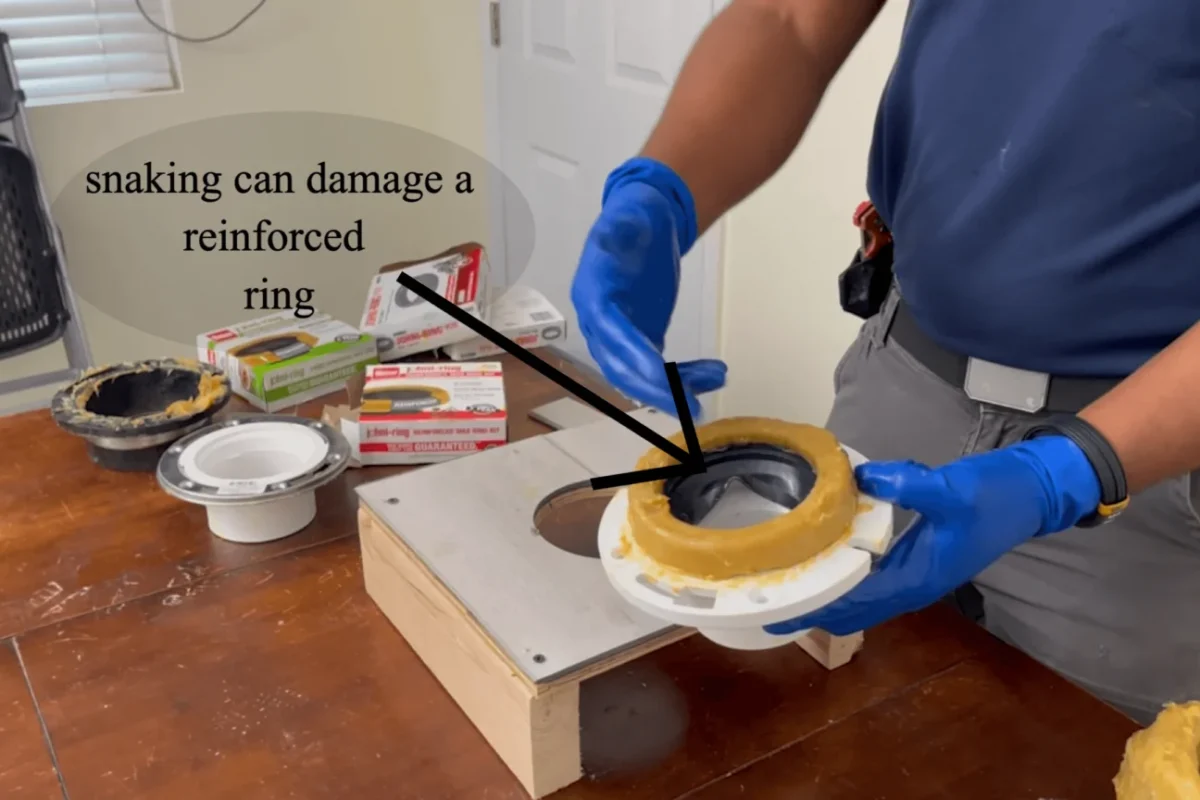
When a toilet begins to leak at its base, the culprit is often a failing wax ring. This small, often overlooked component plays a crucial role in creating a watertight seal between the toilet and the flange on the floor. Understanding the importance of a proper toilet wax ring replacement can save homeowners hundreds of dollars in water damage repairs and protect the integrity of bathroom flooring.
In many homes, the wax ring is installed once during the original toilet setup and then forgotten. Over time, however, normal use, shifting, or even a subtle movement of the toilet can compromise the seal. The result is a slow, steady drip that may go unnoticed until a noticeable puddle forms, a foul odor permeates the bathroom, or a musty smell of mold appears. Recognizing the early signs and knowing how to replace the wax ring yourself not only restores the seal but also empowers you with confidence in basic home maintenance.
Before you reach for a professional plumber, consider that a well‑executed wax ring replacement is one of the most straightforward plumbing repairs you can perform with just a few tools, a bit of patience, and the right guidance. The following comprehensive guide walks you through the entire process, from diagnosing the problem to ensuring a leak‑free finish, while also covering the tools, safety precautions, and common pitfalls to avoid.
Why the Wax Ring Matters: Function and Common Failure Modes

The wax ring sits between the bottom of the toilet bowl and the closet flange, which is anchored to the waste pipe. Its primary purpose is to create a seal that prevents sewer gases from escaping and blocks water from leaking onto the floor. Made of pliable wax—or, in some modern versions, a rubber‑gel composite—the ring compresses under the weight of the toilet, filling any microscopic gaps.
Typical signs that the wax ring needs replacement
- Visible water pooling around the base of the toilet after flushing.
- Foul odors emanating from the bathroom, especially after the toilet is used.
- Loose or wobbling toilet that rocks when pressure is applied.
- Corrosion or rust stains on the floor near the toilet flange.
- Frequent need to tighten the toilet bolts, indicating the seal is not holding.
These symptoms often overlap with other plumbing issues, but a failing wax ring is the most common and cheapest to fix. A quick visual inspection of the floor after a flush can confirm whether water is escaping at the base.
Tools and Materials Needed for a Successful Replacement

Before you begin, gather the following items to ensure a smooth workflow. Having everything on hand prevents interruptions and reduces the risk of making mistakes mid‑project.
Essential tools
- Adjustable wrench or a set of socket wrenches (for removing the toilet bolts).
- Flat‑head screwdriver (to pry off the bolt caps and possibly the old wax).
- Putty knife or scraper (to clean residual wax from the flange and toilet outlet).
- Rubber gloves (to keep your hands clean and protected).
- Bucket or large bowl (to catch any residual water when the toilet is removed).
- Level (optional, to verify the toilet sits evenly after installation).
Materials
- New wax ring (standard or reinforced, depending on your flange condition).
- Wax ring with a built‑in plastic horn (recommended for older homes with a recessed flange).
- New toilet bolts and caps (recommended if the old ones are corroded).
- Silicone sealant (optional, for a final waterproof edge).
For those who prefer a modern alternative, a rubber gasket or a waxless sealing system can be used, but the classic wax ring remains the most reliable and widely available solution.
Step‑by‑Step Guide to Replacing the Wax Ring
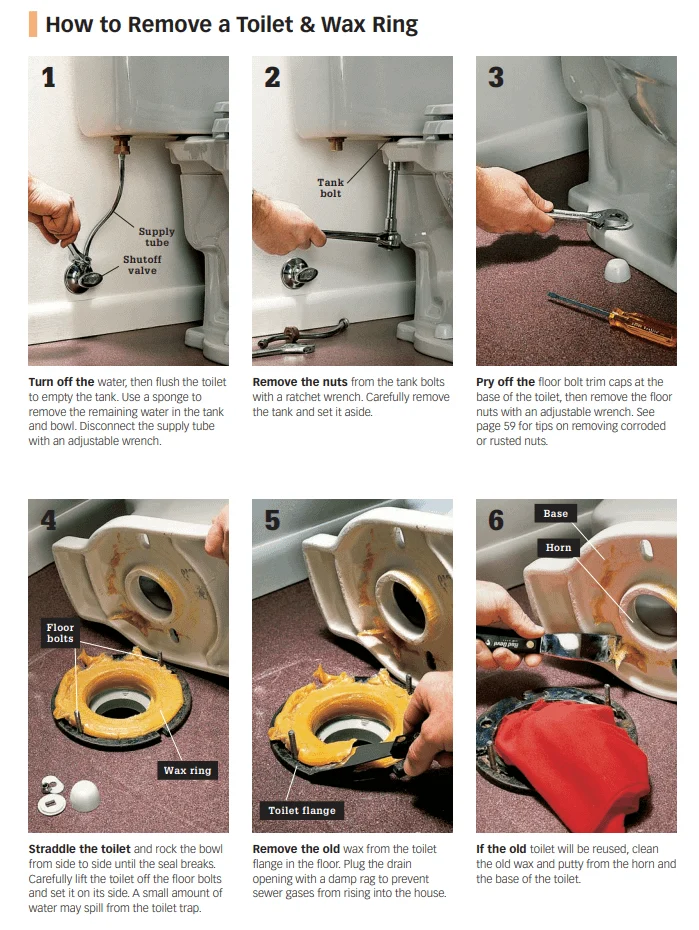
Follow these detailed steps to replace the wax ring safely and efficiently. Take your time, especially during the removal and cleaning phases, as a clean surface ensures a proper seal.
1. Shut Off Water Supply and Empty the Tank
Locate the shut‑off valve behind the toilet (usually a small knob or lever) and turn it clockwise until it stops. Flush the toilet to drain as much water as possible from the tank and bowl. Use a sponge or a small cup to remove any remaining water from the tank and bowl to prevent spillage when the toilet is lifted.
2. Disconnect the Water Line
Using an adjustable wrench, loosen the nut that attaches the flexible water supply line to the bottom of the tank. Have a bucket or towel ready to catch a few drops of water that may escape.
3. Remove the Toilet Bolts
Unscrew the caps covering the bolts at the base of the toilet. Then, using the wrench, loosen and remove the nuts from the bolts. Gently rock the toilet back and forth to break the wax seal. If the toilet resists, tap the base lightly with a rubber mallet to loosen the wax.
4. Lift and Set Aside the Toilet
With assistance (to avoid injury), carefully lift the toilet straight up. Place it on a protective surface like an old blanket or cardboard. Be mindful of the weight; a standard toilet can weigh between 70–120 pounds.
5. Scrape Away the Old Wax
Using the putty knife, remove all remnants of the old wax ring from both the flange and the toilet’s waste outlet. Clean the surfaces thoroughly; any leftover wax will compromise the new seal.
6. Inspect the Flange
Check the closet flange for cracks, rust, or damage. If the flange is broken or sits too low, you may need to repair or replace it before installing the new wax ring. In many cases, a simple flange repair kit or a flange extender will suffice.
7. Position the New Wax Ring
Place the fresh wax ring on the flange, ensuring it is centered. If you’re using a ring with a horn, align the horn with the waste pipe opening for extra sealing power. Some professionals recommend placing the wax ring on the toilet outlet instead; either method works as long as the ring is centered and fully seated.
8. Re‑Install the Toilet
Lower the toilet straight down onto the flange, aligning the bolt holes with the bolts protruding from the floor. Press gently but firmly to compress the wax ring and create the seal. Avoid rocking the toilet; a straight placement ensures even compression.
9. Secure the Toilet
Place washers and nuts on the bolts and tighten them alternately to avoid cracking the porcelain. Tighten until the toilet feels snug but not overly forced—over‑tightening can crack the base.
10. Reconnect the Water Supply and Test
Re‑attach the water supply line, turn the shut‑off valve counter‑clockwise to restore water flow, and allow the tank to fill. Flush the toilet several times while observing the base for any signs of leakage. If a small amount of water appears, gently tighten the bolts a bit more.
11. Finish with Optional Silicone Sealant
For added protection, apply a thin bead of silicone sealant around the base of the toilet where it meets the floor. This step is optional but can prevent water from seeping under the toilet in the future.
Congratulations—your toilet now has a fresh, reliable wax ring seal. This simple maintenance task not only prevents costly water damage but also eliminates the unpleasant odors associated with a compromised seal.
Advanced Tips and Common Pitfalls to Avoid
Even experienced DIYers can encounter challenges when replacing a wax ring. Below are expert tips that help you achieve a professional result and avoid common mistakes that lead to re‑leaks.
Choosing the Right Wax Ring Type
- Standard Wax Ring: Ideal for most modern installations where the flange sits flush with the floor.
- Wax Ring with Plastic Horn: Best for older homes where the flange may be recessed below the floor level; the horn extends into the pipe for a tighter seal.
- Reinforced Wax Ring: Contains a rubber core for added durability, useful in high‑traffic bathrooms.
Ensuring Proper Alignment
A misaligned toilet can cause the wax ring to compress unevenly, leading to leaks. Use a level to check that the toilet sits perfectly horizontal after installation. Small shims made of plastic can be placed under the base if the floor is uneven, but be cautious not to compromise the seal.
Avoid Over‑Tightening Bolts
Excessive torque can crack the porcelain base or strip the bolts. Tighten just enough to eliminate wobble. If the toilet continues to rock after tightening, re‑check the wax ring placement and ensure the flange is not damaged.
Dealing with a Damaged Flange
If the flange is cracked, corroded, or too low, the wax ring alone will not hold. In such cases, install a flange repair kit or replace the flange entirely. This extra step ensures a stable foundation for the wax ring.
When to Use a Waxless Seal
Waxless seals, typically made from silicone or rubber, offer a reusable alternative. They are especially helpful in tight spaces where removing the toilet is difficult. However, they may not provide the same compression seal as wax and are best suited for remodels where the flange condition is optimal.
For a more detailed walkthrough, check out our comprehensive DIY guide on changing a wax ring. It includes video tutorials, troubleshooting charts, and a printable checklist that can be handy on the job site.
Maintenance Practices to Prolong Your Wax Ring’s Life
Even after a perfect installation, regular maintenance can extend the life of your wax ring and prevent future leaks.
Routine Checks
- Inspect the base of the toilet monthly for any signs of moisture.
- Listen for gurgling sounds during flushing, which may indicate venting issues that affect the seal.
- Keep the floor around the toilet dry and free of cleaning chemicals that could degrade the wax over time.
Weight Distribution
Avoid standing or jumping on the toilet seat, as excessive weight can shift the toilet slightly, breaking the seal. Encourage family members to use the toilet gently and to avoid placing heavy objects on the lid.
Periodic Re‑Sealing
If your bathroom experiences frequent temperature fluctuations or high humidity (common in basements), consider inspecting the wax ring annually. Re‑sealing proactively can prevent unexpected leaks during the colder months when pipes contract.
Understanding the role of the wax ring in the overall plumbing system is crucial. Our article explains how this humble component fits into the larger picture of bathroom hygiene and structural integrity, offering insight into why its proper maintenance matters beyond just stopping leaks.
By following the steps and tips outlined above, you’ll be equipped to tackle a toilet wax ring replacement confidently. Not only will you save money on professional services, but you’ll also gain a deeper appreciation for the small details that keep your home dry, safe, and comfortable.