 Admin
AdminReplacing the wax ring on a toilet is one of the most common yet critical DIY plumbing tasks every homeowner should master. A compromised wax seal can lead to unpleasant odors, water damage, and costly repairs, making it essential to understand not only how to perform the replacement but also why the wax ring matters in the first place. In this comprehensive guide, we’ll walk you through every stage—from gathering the right tools to testing the seal—so you can tackle the job with confidence and avoid future leaks.
Whether you’ve noticed a slow drip around the base of the toilet, a persistent foul smell, or you’re simply preparing for a bathroom remodel, the process of swapping out the wax ring is straightforward when approached methodically. By following the detailed steps outlined below, you’ll be able to restore a watertight connection between the toilet and the waste pipe, protecting both your floor and your peace of mind.
Before we dive into the hands‑on portion, it’s worth understanding the role of the wax ring and the common failure modes that can jeopardize its performance. A quick read of why the wax ring matters will give you a solid foundation, but the practical instructions that follow will turn that knowledge into action.
Understanding the Wax Ring and Its Role
What Is a Wax Ring?
A wax ring is a doughnut‑shaped seal made from pliable wax, sometimes reinforced with a plastic or rubber core. It sits between the bottom of the toilet’s horn (the part that fits onto the floor flange) and the flange itself, creating a water‑tight barrier that prevents sewer gases and waste water from escaping into the bathroom.
Why the Wax Ring Can Fail
Despite its simplicity, the wax ring is subject to several stressors:
- Movement: Shifting the toilet during cleaning or due to a loose floor can tear the wax.
- Temperature Changes: Fluctuations can cause the wax to become brittle or overly soft.
- Improper Installation: A misaligned or overly compressed ring will not seal correctly.
- Age: Over time, the wax can degrade, especially in humid environments.
When any of these factors come into play, you’ll typically notice water pooling at the base or a distinct foul odor—clear signs that the seal needs replacement.
Tools and Materials You’ll Need
Essential Tools
- Adjustable wrench or socket set (for bolt removal)
- Flat‑head screwdriver (to pry off the toilet if needed)
- Bucket or large bowl (to catch residual water)
- Old towels or rags (to protect the floor)
- Rubber gloves (for hygiene)
- Putty knife (optional, for cleaning the flange)
Materials
- New wax ring (standard or reinforced, depending on your flange condition)
- Optional: Wax ring with a flange (provides extra stability on uneven floors)
- Silicone caulk (to seal the base after installation, if desired)
Step‑by‑Step Guide to Replacing the Wax Ring
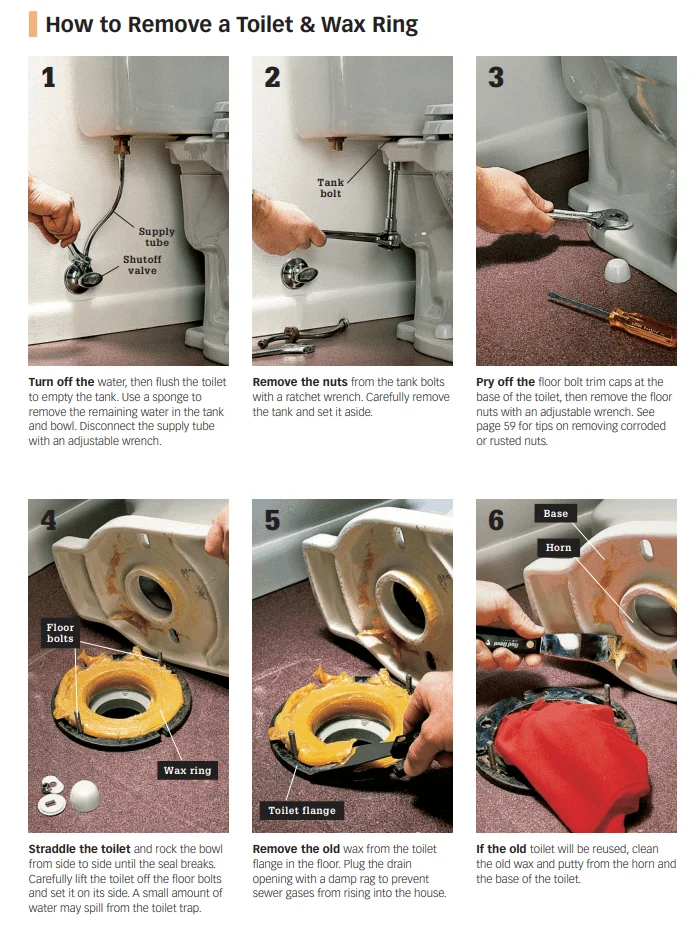
1. Turn Off the Water Supply
Locate the shut‑off valve behind the toilet and turn it clockwise until it stops. Flush the toilet to empty the tank and bowl, then use a sponge or towel to soak up any remaining water in the tank.
2. Disconnect the Water Line
Using an adjustable wrench, loosen the nut that attaches the supply line to the bottom of the tank. Have a bucket ready to catch any drips.
3. Remove the Toilet
Locate the two bolts securing the toilet to the floor. Unscrew them carefully—some older models may have plastic caps covering the bolt heads. Once the bolts are removed, gently rock the toilet back and forth to break the seal, then lift it straight up. It’s heavy, so consider having a helper.
4. Inspect the Flange
With the toilet removed, examine the closet flange for cracks, corrosion, or misalignment. If the flange sits below the floor level, you may need a flange extender or a reinforced wax ring with a built‑in flange. Clean any old wax residue with a putty knife and wipe the area clean.
5. Install the New Wax Ring
Place the new wax ring directly onto the flange, ensuring it’s centered. If you’re using a wax ring with a built‑in flange, position the flange side against the floor for added support. Some professionals recommend pressing the ring gently with a gloved hand to seat it snugly.
6. Re‑seat the Toilet
Carefully lower the toilet onto the wax ring, aligning the bolt holes with the flange bolts. Press down firmly but evenly, allowing the weight of the toilet to compress the wax and form a seal. Avoid rocking the unit; a straight, steady placement is key.
7. Secure the Toilet
Replace the nuts onto the floor bolts and tighten them just enough to hold the toilet firmly—over‑tightening can crack the porcelain. Trim any excess bolt length with a hacksaw if needed, then snap on the decorative caps.
8. Reconnect the Water Supply
Re‑attach the supply line to the tank, tighten the nut, and turn the shut‑off valve counter‑clockwise to restore water flow. Let the tank fill, then flush several times to check for leaks around the base and at the water connection.
9. Finish Up
If you notice any minor seepage, apply a thin bead of silicone caulk around the base of the toilet to seal any gaps between the porcelain and the floor. This step is optional but adds an extra layer of protection.
Tips for a Long‑Lasting Seal
Choose the Right Wax Ring
Standard wax rings work well on level floors with a correctly positioned flange. However, for older homes where the flange may sit below the floor, opt for a reinforced ring or one that includes a plastic flange. These provide extra stability and reduce the risk of future leaks.
Mind the Alignment
Even a slight misalignment can compromise the seal. Take a moment to ensure the toilet is perfectly centered over the flange before tightening the bolts. A small piece of scrap cardboard can be placed under the toilet temporarily to help guide it into the right position.
Avoid Over‑Tightening
While it’s tempting to crank the bolts tight, excessive force can crack the porcelain or warp the flange. Tighten the bolts just enough to keep the toilet from moving.
Consider a Wax‑Free Seal
For those who prefer a less messy solution, there are wax‑free rubber gaskets available. They are reusable and can be a good alternative in high‑traffic bathrooms, though traditional wax remains the most widely used and cost‑effective option.
Troubleshooting Common Issues
Persistent Leaks After Installation
If water continues to pool around the base after you’ve followed the steps, double‑check the flange height. A flange that sits more than ½ inch below the floor often requires an extender or a thicker wax ring. Also, inspect the bolts to ensure they are not loosening under the toilet’s weight.
Bad Odor Even with a New Ring
A lingering smell could indicate a cracked toilet base or a problem with the vent stack. Verify that the wax ring is properly seated and that the toilet sits flush on the floor. If the odor persists, you may need to perform a more thorough inspection of the waste line.
Toilet Wobbles
Wobbling suggests that the floor bolts are not firmly anchored or the flange is damaged. Tighten the bolts and, if necessary, use shims made of plastic or wood to level the toilet before final tightening.
For an even deeper dive into the replacement process, see our DIY guide to changing a wax ring, which offers additional photos and troubleshooting tips.
Replacing the wax ring on a toilet may sound daunting, but with the right preparation and a methodical approach, it’s a task most homeowners can accomplish in under an hour. By understanding the function of the wax ring, using the proper tools, and following each step carefully, you’ll safeguard your bathroom from leaks and unpleasant odors for years to come. Remember to inspect the flange regularly, choose the appropriate seal for your floor condition, and never underestimate the power of a well‑tightened bolt. With these practices in place, you’ll enjoy a clean, dry, and odor‑free bathroom every day.