 Admin
Admin
Graduation marks a pivotal moment—a celebration of years of hard work, late‑night study sessions, and personal growth. While caps, gowns, and diplomas are the traditional symbols, the sweet finale of a candy table can transform the event into a memorable feast for both eyes and taste buds. Whether you’re hosting a small backyard gathering or a large hall ceremony, a well‑planned candy display adds a playful touch that resonates with graduates of all ages.
Choosing the right candy table setup involves more than just stacking bowls of sweets. It’s about harmonizing colors, textures, and themes that echo the graduate’s personality, school colors, or future aspirations. By weaving together thoughtful décor, strategic placement, and interactive elements, you can craft a candy experience that feels both sophisticated and delightfully nostalgic.
Candy Table Ideas for Graduation: Core Concepts and Planning
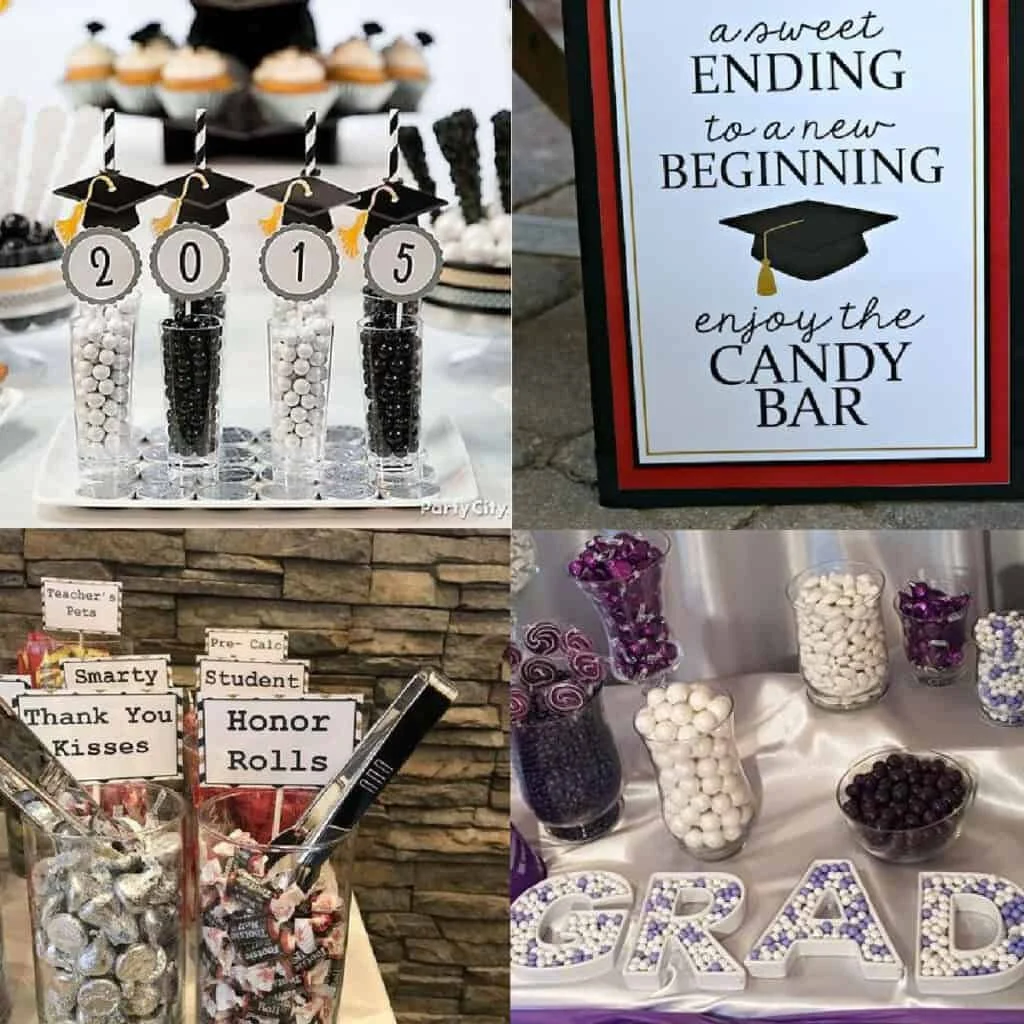
Before diving into specific designs, consider the foundational elements that will guide your candy table. Start with a clear vision of the event’s overall aesthetic. Is the ceremony formal, with navy and gold accents, or is it a relaxed, bohemian gathering with pastel hues? Aligning the candy table with the broader décor ensures cohesion and prevents visual clutter.
Candy Table Ideas for Graduation: Color Coordination
- School colors: Incorporate the institution’s palette by using matching ribbons, tablecloths, and candy wrappers. For example, a crimson and gold graduation can feature ruby‑red M&Ms paired with gold‑wrapped chocolate squares.
- Seasonal tones: If the ceremony falls in spring, pastel pinks, mint greens, and soft yellows evoke a fresh, youthful vibe.
- Future themes: For graduates heading into a specific field, use colors that reflect their career path—navy for naval engineering, teal for marine biology, etc.
Color coordination extends to the containers you select. Transparent glass jars showcase bright candies, while matte ceramic bowls can mute vibrant hues for a more refined look. Mixing container types adds depth, but keep the overall palette consistent to avoid chaos.
Design Layouts That Wow

Strategic layout influences both the visual impact and the flow of guests. Below are three proven arrangements that can be adapted to any venue size.
Linear Candy Bar: Simple Yet Elegant
A linear candy bar stretches across a long table, allowing guests to walk along one side while selecting treats. This design works best in banquet halls where space is limited. Place a decorative runner in the school’s colors, and line the center with a tiered stand holding assorted candies. Add a small sign—perhaps a chalkboard—detailing the “Graduation Sweet Station” to guide attendees.
Island Centerpiece: The Focal Point
For more intimate gatherings, consider a candy island positioned at the heart of a round or square table. Surround the island with small floral arrangements or succulents that match the color scheme. Use a multi‑tiered cake stand to elevate different candy categories—hard candies on the bottom tier, gummies in the middle, and premium chocolates on top. This arrangement creates a visual hierarchy that draws the eye and encourages guests to explore each level.
Interactive Candy Stations: Fun and Engaging
Turn the candy table into an activity hub by offering DIY mix‑and‑match stations. Provide small bags, scoops, and a variety of candies so guests can curate their own sweet bundles. Label each candy with playful graduation‑themed tags such as “Honor Roll Crunch” for pretzel sticks or “Cap & Gown Gummies.” This hands‑on approach not only entertains but also serves as a conversation starter among attendees.
When designing your layout, remember to leave enough space for guests to move comfortably. Overcrowding can lead to accidental spills and a less enjoyable experience.
Choosing the Perfect Candies

The selection of sweets should reflect both the taste preferences of the graduates and the overall theme. Here are some categories to consider:
- Classic favorites: Chocolate-covered almonds, caramel chews, and peanut butter cups are timeless choices that appeal to a wide audience.
- Retro candies: Bring a touch of nostalgia with Pop Rocks, Nerds, or Fun Dip, evoking memories of schoolyard treats.
- Health‑conscious options: Include dark chocolate, dried fruit, and sugar‑free gummy bears for guests who prefer lighter indulgences.
- Personalized treats: Order custom‑wrapped candies featuring the graduate’s name or school logo for a unique touch.
Mix textures—crunchy, chewy, creamy—to keep the palate engaged. For a cohesive look, opt for candies in colors that echo your chosen palette. A well‑balanced assortment ensures no guest walks away disappointed.
Decorative Enhancements and Accents

Beyond the candies themselves, decorative elements elevate the table from functional to spectacular. Here are essential accessories to consider:
Table Liners and Runners
A high‑quality tablecloth in a solid color provides a clean canvas. Layer a patterned runner that incorporates school insignia or graduation motifs such as diplomas and mortarboards. This adds visual interest without overwhelming the candy display.
Signage and Labels
Clear labeling not only guides guests but also adds a decorative flair. Use acrylic stands or wooden chalkboards to denote candy types. For a personalized touch, include short messages like “Congratulations, Class of 2026!” or “Sweet Success Ahead.”
Floral and Greenery Arrangements
Fresh flowers or greenery soften the sugary vibe and introduce an element of elegance. Choose blooms that match your color scheme—white lilies for a classic look, or lavender sprigs for a spring graduation.
Lighting
Soft, ambient lighting—such as fairy lights draped across the table edge or small LED votives—creates a warm glow that highlights the candy’s colors. If the venue permits, a subtle spotlight can draw attention directly to the candy island.
Practical Tips for a Smooth Setup
Even the most creative candy table can falter without proper planning. Follow these practical guidelines to ensure everything runs like clockwork.
- Pre‑measure portions: Fill containers ahead of time to avoid last‑minute scrambling.
- Use liners: Place disposable liners in bowls to simplify clean‑up.
- Keep candies fresh: Store sugary treats in a cool, dry place until the event starts; humidity can cause them to melt or become sticky.
- Assign a candy steward: Designate a friend or family member to replenish bowls and tidy the area throughout the celebration.
- Consider allergies: Clearly label common allergens such as nuts, dairy, or gluten to keep guests safe.
For additional inspiration on how to integrate a candy table into a larger event, see our guide on Buffet Table Ideas at Home – Creative Tips for Stunning Gatherings. The principles of flow and visual balance apply equally to candy displays.
Budget-Friendly Alternatives
Creating a stunning candy table doesn’t have to break the bank. Here are cost‑saving strategies that still deliver wow factor:
- DIY containers: Repurpose mason jars, tin cans, or vintage teacups for an eclectic look.
- Bulk purchasing: Buy candies in bulk from wholesale clubs and portion them into smaller, decorative bags.
- Handmade signage: Use printable templates and cardstock to craft personalized signs.
- Seasonal décor: Incorporate natural elements like pine cones or autumn leaves when appropriate; they’re often free and add texture.
If you’re looking for ideas that blend sweet treats with a broader event décor, our article on Buffet Table Decoration Ideas: Creative Tips for Stunning Events offers valuable insights that can be adapted for graduation celebrations.
Making the Candy Table a Keepsake
Graduations are milestone moments worth remembering. Transform your candy table into a keepsake by offering guests a souvenir they can take home. Small, personalized candy bags with a printed tag that reads “Class of 2026 – Sweet Memories” serve as a lasting reminder of the day’s joy. You can also create a photo backdrop behind the candy table—perhaps a banner with the graduate’s name—so guests can snap pictures that incorporate both the sweet spread and the celebratory atmosphere.
Another thoughtful idea is to include a “memory jar” where guests write a short congratulatory note or a piece of advice for the graduate. Place the jar near the candy station, encouraging attendees to contribute before they select their treats. Later, the graduate can read the heartfelt messages, making the candy table a source of both sweet and sentimental value.
Integrating the Candy Table with Other Event Elements
For a seamless experience, ensure the candy table complements the rest of the graduation’s program. Position it near the reception area so guests can mingle and indulge after the ceremony, but keep it away from high‑traffic zones to prevent crowding. Coordinate timing—open the candy station once the formal speeches conclude, allowing graduates and families to celebrate without missing key moments.
If you’re planning a multi‑course dinner, consider offering a mini candy tasting as a palate cleanser between courses. This not only adds a whimsical twist but also keeps the candy table relevant throughout the event.
Final Thoughts
Designing an unforgettable candy table for a graduation celebration blends creativity, strategic planning, and an understanding of the graduate’s unique journey. By thoughtfully selecting colors, arranging layouts, curating candy varieties, and adding decorative touches, you create a sweet centerpiece that resonates with guests of all ages. Remember to keep practicality in mind—prepare ahead, label allergens, and assign a steward to maintain the display. Whether you opt for a luxurious multi‑tiered island or a simple linear bar, the goal remains the same: to celebrate achievement with a delightful, memorable experience that leaves a lasting impression.
When the caps are tossed and the diplomas are handed out, the lingering taste of your candy table will remind everyone that graduation is not just an ending, but a sweet beginning.
