 Admin
AdminWhen the water in your bathroom starts to seep around the base of the toilet, the culprit is often a worn‑out wax ring. Replace wax ring is a phrase you’ll hear frequently in plumbing forums, and for good reason: a faulty seal can lead to water damage, unpleasant odors, and even mold growth if left unattended. Fortunately, swapping out a wax ring is one of the most manageable plumbing tasks you can tackle without calling a professional, provided you follow the right steps and take a few safety precautions.
In this comprehensive guide, we’ll walk you through everything you need to know—from understanding how a wax ring works to gathering the right tools, performing the removal, installing a new seal, and testing for leaks. Whether you’re a seasoned DIYer or a first‑time homeowner, the information here is organized to give you confidence and a clear roadmap. By the end of the article, you’ll be able to replace a wax ring efficiently, keep your bathroom dry, and save on costly plumber fees.
Before diving into the hands‑on process, it’s worth appreciating why the wax ring is such a critical component of your toilet assembly. It serves as a flexible, water‑tight barrier between the toilet’s flange and the drain pipe, accommodating slight movements while preventing waste and water from escaping. Over time, however, the wax can degrade, compress, or become misaligned, especially after frequent cleaning or a hard flush. Recognizing the early signs—such as a wobbly toilet, a persistent foul smell, or visible water at the base—can help you act before the problem escalates.
Understanding the Wax Ring and Its Role
The wax ring is a simple yet ingenious device. Typically composed of a solid block of wax or a wax‑based composite, it’s placed on the closet flange (the circular pipe fitting on the floor) before the toilet is lowered onto it. When the toilet sits firmly, the weight compresses the wax, creating a seal that blocks both waste and water from escaping.
Types of Wax Rings
- Standard Wax Ring: The most common type, made entirely of wax, often includes a small plastic funnel to help guide waste.
- Wax Ring with Plastic Sleeve: Incorporates a thin plastic sleeve that reinforces the seal, especially useful on uneven floors or older flanges.
- Rubber or Foam Gasket: A modern alternative to wax, these are reusable and less messy, though some plumbers still prefer wax for its proven reliability.
When to Replace the Wax Ring
- Toilet begins to rock or wobble.
- Visible water or odor at the base.
- After reinstalling a toilet following a repair.
- When the flange is corroded or damaged (often the ring is replaced simultaneously).
Gathering the Right Tools and Materials
Preparation is half the battle. Having the correct tools on hand not only speeds up the job but also reduces the risk of damaging the toilet or surrounding fixtures.
Essential Tools
- Adjustable wrench or a set of socket wrenches (typically 7 mm for the toilet bolts).
- Flathead screwdriver.
- Putty knife or scraper (for removing old wax).
- Rubber gloves and safety goggles.
- Bucket or towels (to catch any residual water).
- Level (optional, for checking toilet stability).
Materials to Have Ready
- New wax ring (choose the type that matches your flange condition).
- New closet bolts and washers (recommended if the old ones are corroded).
- Plumber’s putty (optional, for sealing the base after installation).
While you’re assembling your toolkit, consider checking out the big comfy sectional couch that redefines living‑room luxury for a fresh perspective on how small upgrades can dramatically improve comfort and style across your home. Just as a new wax ring protects your bathroom’s integrity, a well‑chosen sofa can safeguard your living space’s aesthetic appeal.
Step‑By‑Step Procedure for Replacing the Wax Ring
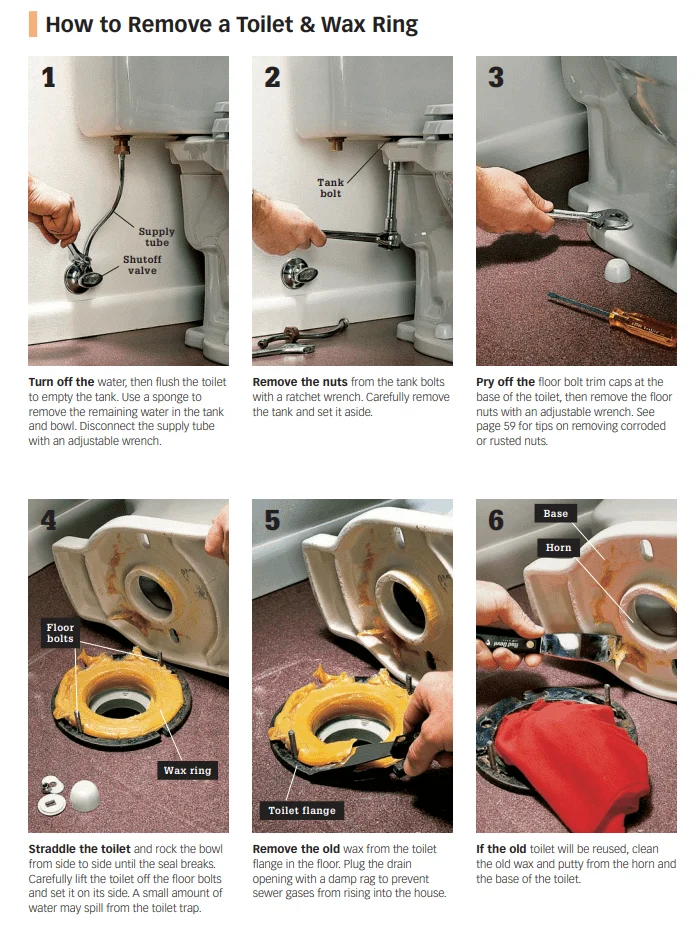
Follow these detailed steps to ensure a leak‑free installation. Take your time, especially during the removal phase, to avoid unnecessary damage.
1. Shut Off the Water Supply
Locate the shut‑off valve behind the toilet (usually a small knob or lever) and turn it clockwise until it stops. Flush the toilet to drain as much water as possible from the tank and bowl. Use a sponge or towel to soak up any remaining water in the tank.
2. Disconnect the Water Line
Using an adjustable wrench, loosen the nut that attaches the water supply line to the bottom of the tank. Have a bucket ready to catch any residual water that may spill when you remove the line.
3. Remove the Toilet
Locate the two (or sometimes three) closet bolts that secure the toilet to the floor. Unscrew the nuts with a wrench, then gently rock the toilet back and forth to break the seal. Lift the toilet straight up—avoid tilting it—to prevent cracking the porcelain. Place the toilet on a protective blanket or cardboard.
4. Scrape Off the Old Wax
Use a putty knife to carefully scrape away the old wax from the flange and the bottom of the toilet. Ensure the flange is clean and free of debris. If the flange is cracked or broken, it should be replaced before proceeding.
5. Inspect the Flange
Check that the flange sits flush with the finished floor. If it sits below floor level, consider using a flange extender or a thicker wax ring with a built‑in funnel. A properly seated flange is crucial for a watertight seal.
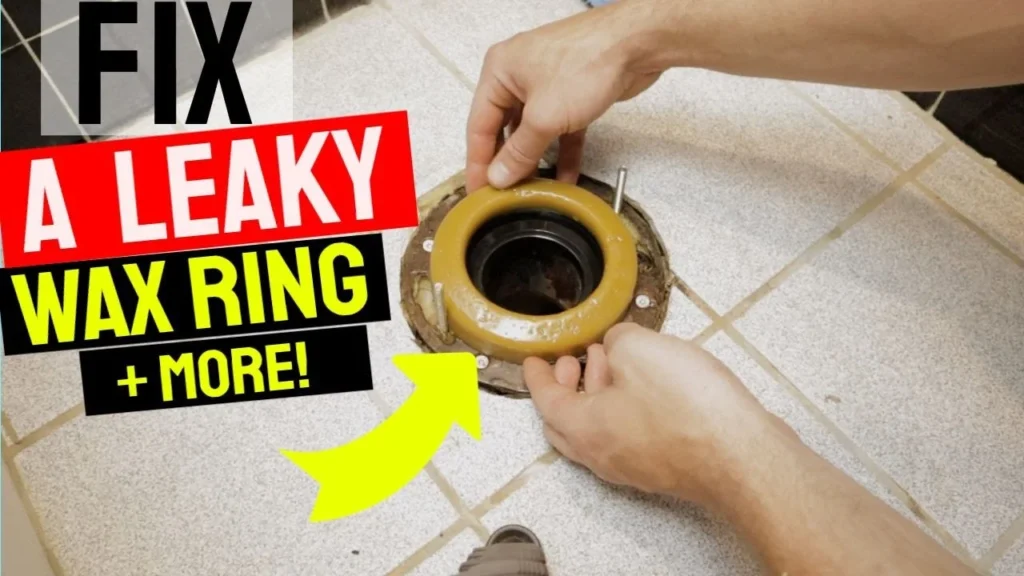
6. Install the New Wax Ring
Place the new wax ring directly onto the flange, centering it over the opening. For rings with a plastic sleeve, ensure the sleeve is oriented upward, toward the toilet. Some plumbers prefer to position the wax ring on the toilet outlet instead; either method works as long as the seal is even.
7. Re‑Seat the Toilet
Carefully lower the toilet onto the wax ring, aligning the bolt holes with the closet bolts. Press down firmly and evenly to compress the wax, creating the seal. Avoid rocking the toilet; a steady, even pressure is essential.
8. Secure the Toilet
Place washers and nuts onto the closet bolts and tighten them gradually, alternating sides to keep the toilet level. Do not overtighten, as this can crack the porcelain. Use a level to verify that the toilet is perfectly horizontal.
9. Reconnect the Water Supply
Attach the water supply line back to the tank, tighten the nut, and turn the shut‑off valve counter‑clockwise to restore water flow. Allow the tank to fill, then flush the toilet a few times while checking for leaks around the base and the water connection.
10. Seal the Base (Optional)
If desired, apply a thin bead of plumber’s putty or silicone caulk around the base of the toilet. This step is optional; some prefer not to seal the base to make future removal easier. If you choose to caulk, smooth the bead with a damp finger for a clean finish.
Testing and Troubleshooting
After completing the installation, it’s critical to ensure that the seal is effective.
Leak Test
- Observe the base for any water droplets during several flush cycles.
- Check the supply line connections for drips.
- Inspect the floor around the toilet for any signs of moisture.
Common Issues and Fixes
- Wobbling Toilet: Re‑tighten the bolts gradually; if wobble persists, the flange may be uneven.
- Persistent Odor: Verify that the wax ring is fully seated and not broken. A cracked ring may need replacement.
- Water Pooling: Ensure the water supply line is not leaking and that the toilet bowl is not cracked.
Maintenance Tips to Prolong Wax Ring Life
While wax rings are designed to last several years, certain habits can extend their lifespan and keep your bathroom in top condition.
Gentle Flushing
Avoid flushing large, non‑dissolvable objects that could stress the seal. Use a moderate amount of toilet paper and consider a dual‑flush system for water efficiency.
Regular Checks
Inspect the toilet base quarterly for any signs of movement or moisture. Early detection helps avoid major repairs later.
Floor Protection
Place a waterproof mat or rug around the toilet to catch any accidental spills. This also reduces the chance of water seeping under the wax ring.
When to Call a Professional
Even the most capable DIYer may encounter situations that warrant a plumber’s expertise. If you notice any of the following, it’s wise to seek professional help:
- Severe flange damage or rust that requires replacement.
- Persistent leaks despite a correctly installed wax ring.
- Cracks in the toilet bowl or tank.
- Inadequate tools or limited space that make safe removal difficult.
Remember, a professional can also advise on alternative sealing solutions, such as silicone gaskets, which may be better suited for unique bathroom configurations.
Cost Considerations and Budgeting

The expense of replacing a wax ring is relatively low compared to hiring a plumber. A standard wax ring costs between $2 and $10, while a wax ring with a plastic sleeve ranges from $5 to $15. If you need new bolts or a flange repair, expect to add $10–$30 to the total cost. By doing the work yourself, you can save upwards of $150–$300 in labor fees.
Investing a modest amount of time and money into a proper wax ring replacement not only protects your home’s structural integrity but also contributes to lower water bills by preventing hidden leaks that waste water over time.
For those who enjoy broader home improvement projects, consider how a well‑executed bathroom repair complements other upgrades, such as installing a sleek kitchen island (the ultimate guide to kitchen island for stove mastery) or revamping your living room with a stylish sectional. Each small improvement builds toward a cohesive, functional, and aesthetically pleasing home.
In summary, replacing a wax ring is a straightforward, cost‑effective solution to a common bathroom problem. By understanding the function of the wax ring, gathering the appropriate tools, and following the step‑by‑step method outlined above, you can confidently eliminate leaks, avoid water damage, and enjoy a stable, odor‑free toilet for years to come. Keep an eye on your bathroom’s health, act promptly when you notice issues, and you’ll save both time and money while maintaining the comfort and safety of your home.