 Admin
Admin
Replacing a wax ring on a toilet is one of those home‑maintenance tasks that sounds intimidating until you see it broken down into clear, manageable steps. The wax ring is the critical seal between the toilet base and the waste pipe; when it fails, you’ll notice water pooling around the floor, foul odors, or a constantly running toilet. Understanding how to replace a wax ring on a toilet not only prevents costly water damage but also empowers you to tackle bathroom repairs with confidence.
In this comprehensive guide, we’ll walk you through everything you need—from gathering the right tools to testing the seal after installation. Whether you’re a seasoned DIYer or a first‑time homeowner, you’ll find practical advice, safety precautions, and insider tips that make the process straightforward. By the end, you’ll be equipped to handle a wax‑ring replacement like a pro and keep your bathroom dry and functional.
Let’s dive in and demystify the process, ensuring that your next bathroom repair is smooth, leak‑free, and budget‑friendly.
Essential Tools and Materials
Before you start, assemble all necessary items. Having everything within reach prevents interruptions and reduces the chance of mistakes.
- New wax ring (standard or reinforced, depending on your toilet’s age)
- Adjustable wrench or a set of socket wrenches
- Flat‑head screwdriver
- Rubber gloves and safety goggles
- Putty knife or scraper
- Bucket or large bowl for water
- Old towels or rags
- Plumber’s putty (optional, for added seal)
- Silicone sealant (optional, for extra security)
If you’re uncertain about which type of wax ring suits your toilet, check out The Ultimate Guide to Installing a Wax Ring – Stop Leaks and Save Money Today! for a quick comparison.
Safety First: Precautions to Take

Turn Off the Water Supply
Locate the shut‑off valve behind the toilet (usually on the left side) and turn it clockwise until it stops. Flush the toilet to empty the tank and bowl, then hold the handle down to release any remaining water.
Protect Your Floor
Place old towels or a waterproof tarp on the floor around the base. This protects against accidental spills and makes cleanup easier.
Wear Protective Gear
Gloves and goggles guard against splashes and any sharp debris that might be hidden under the toilet base.
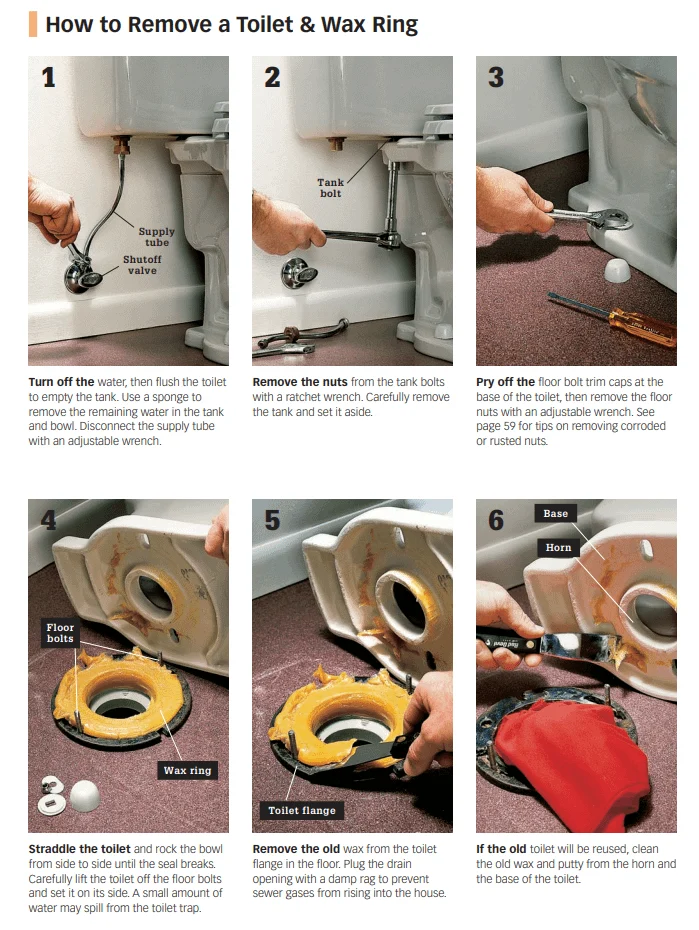
Removing the Old Wax Ring
Detach the Toilet
Using the adjustable wrench, loosen the bolts that secure the toilet to the flange. Turn each bolt counter‑clockwise, but don’t remove them just yet; keep them nearby for re‑assembly.
Lift the Toilet
Gently rock the toilet back and forth to break the seal. With the help of a friend (to avoid back injury), lift the toilet straight up and set it on the prepared towels. If the toilet is heavy, you can use a piece of plywood as a sled to slide it away safely.
Clean the Flange
Scrape away the old wax residue from the flange and the bottom of the toilet using a putty knife. Ensure the surface is smooth and free of debris; a clean flange guarantees a proper seal for the new wax ring.
Installing the New Wax Ring
Choose the Right Wax Ring
Standard wax rings work for most installations, but if you have a cracked flange or a slightly uneven floor, consider a reinforced wax ring with a plastic or rubber collar. These provide extra stability and are easier to position correctly.
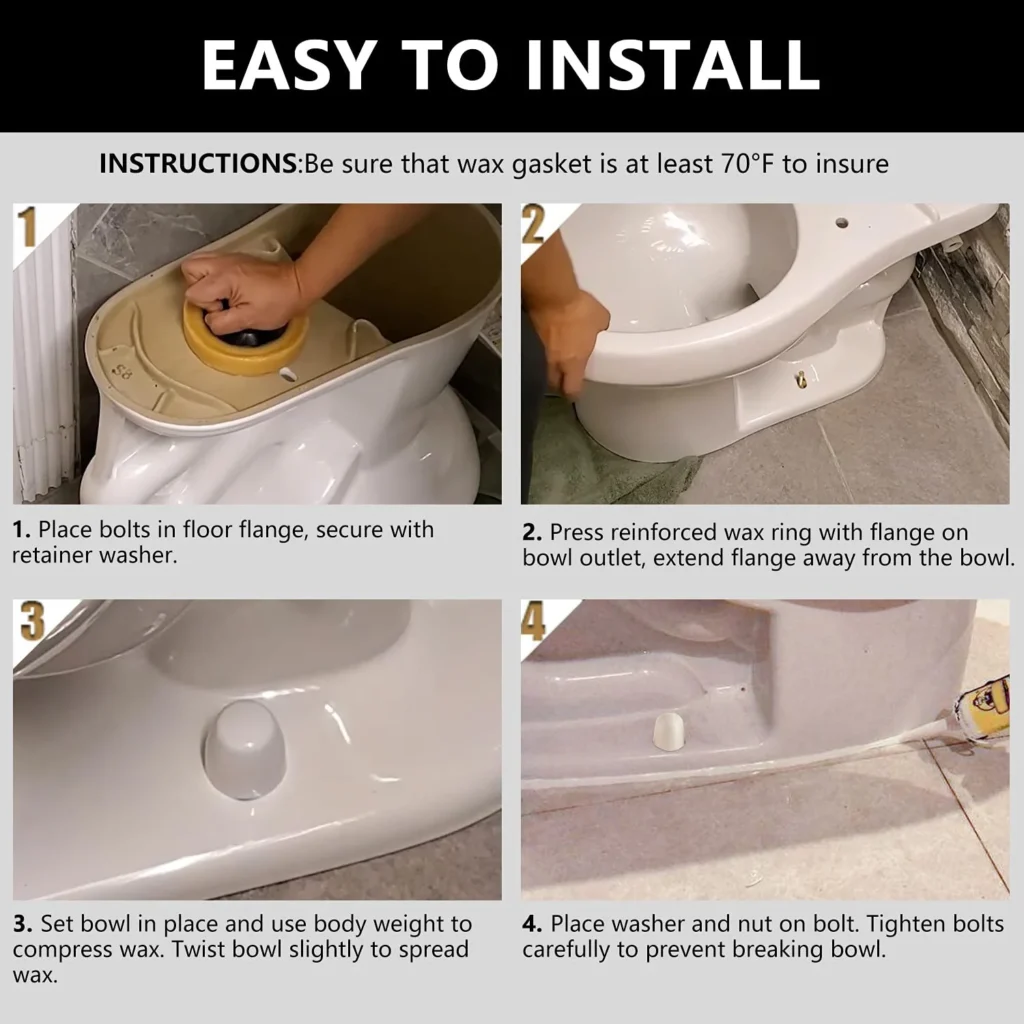
Position the Wax Ring
Place the new wax ring directly onto the flange, centering it over the drain opening. Some installers prefer to set the wax ring on the toilet outlet instead; whichever method you choose, ensure the ring sits flat and fully covers the opening.
Optional Seal Enhancements
For added protection, apply a thin bead of plumber’s putty around the edge of the wax ring, or a small line of silicone sealant on the flange. This helps prevent minor leaks and can extend the life of the seal.
Reinstalling the Toilet
Set the Toilet Back in Place
Carefully lower the toilet onto the flange, aligning the bolt holes in the base with the closet bolts. Press down firmly and evenly to compress the wax ring, creating a watertight seal.
Secure the Bolts
Tighten the bolts a quarter turn at a time, alternating sides to keep the pressure even. Avoid over‑tightening, which can crack the porcelain. Once snug, add a washer and nut to each bolt, then give a final gentle turn.
Reconnect the Water Supply
Re‑attach the supply line to the tank inlet, turn the shut‑off valve counter‑clockwise, and let the tank fill. Flush a few times to check for any wobble or movement; adjust the bolts if necessary.
Testing for Leaks
Inspect the Base
After a few flushes, examine the area around the base for any signs of water. Use a dry cloth to feel for moisture; a steady drip indicates a seal issue.
Check the Supply Line
Watch the connection where the water line meets the tank. A small leak here is usually unrelated to the wax ring, but tightening the coupling may be needed.
Final Confirmation
If everything remains dry after 10–15 minutes, you’ve successfully replaced the wax ring. For added peace of mind, you can place a piece of newspaper under the toilet for a day; any wet spots will be evident.
Maintenance Tips to Prolong the Life of Your Wax Ring

- Avoid rocking the toilet: Excessive movement can break the wax seal over time. If the toilet feels loose, tighten the bolts slightly.
- Check the flange annually: A damaged or misaligned flange can cause premature wax ring failure.
- Use a toilet mat: Placing a mat or rug can reduce direct impact on the wax ring from dropped items.
- Consider a wax‑free seal: Modern wax‑free gaskets (rubber or foam) provide a long‑lasting alternative, especially in high‑traffic bathrooms.
When you’re ready for the next DIY challenge, you might find inspiration from other home improvement projects. For instance, learning how to select the perfect sectional sofa can transform your living space just as effectively as fixing a leak transforms your bathroom. Check out The Only Guide You Need to Choose the Best Sectional Sofa for Family Comfort and Style for design ideas that complement a freshly renovated bathroom.
Remember, the key to a successful wax‑ring replacement lies in preparation, careful execution, and thorough testing. By following this guide, you’ll not only stop current leaks but also prevent future ones, saving both water and money. So grab your tools, take a deep breath, and enjoy the satisfaction of a job well done.