 Admin
Admin
When it comes to bathroom maintenance, few tasks are as dreaded—and as essential—as a toilet replace wax ring. A failing wax seal can turn a pristine bathroom into a soggy mess, leading to costly repairs and endless frustration. Fortunately, understanding the role of the wax ring, recognizing the warning signs, and mastering the replacement process can save you time, money, and a lot of headaches.
In this comprehensive guide, we’ll walk you through the science behind wax rings, the tools you’ll need, and a detailed, no‑nonsense procedure that even a first‑time DIYer can follow. Whether you’re fixing a minor drip or tackling a full‑scale remodel, the knowledge you gain here will empower you to handle the job with confidence and precision.
Why the Wax Ring Matters: Function and Failure Modes
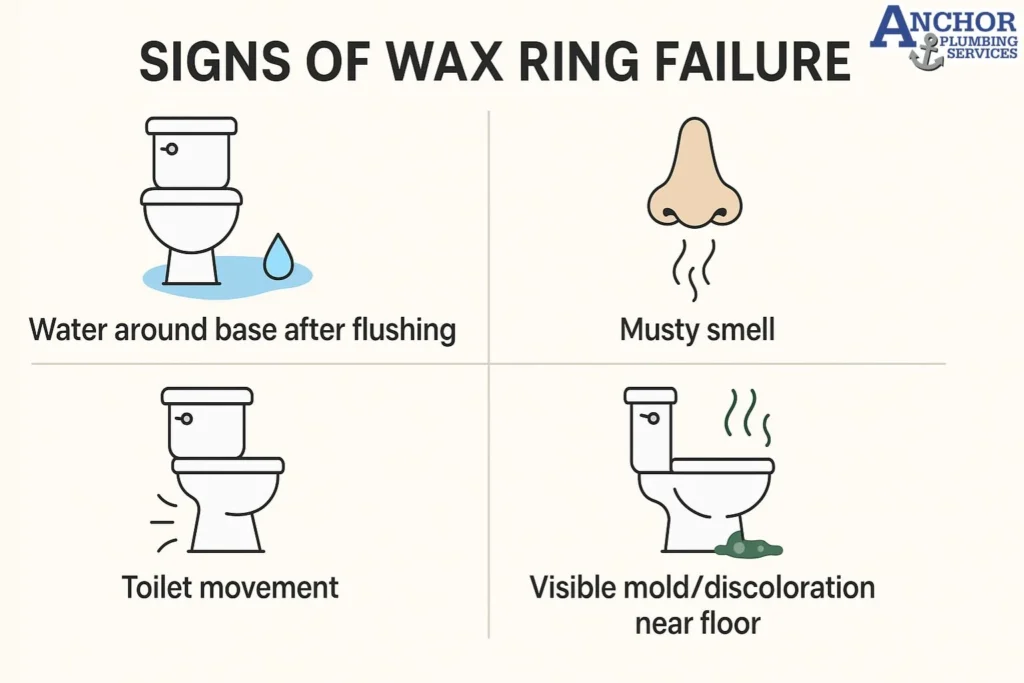
The wax ring is a simple yet critical component that creates a seal between the toilet’s base and the floor flange. Made from pliable wax (or sometimes a wax‑free polymer), it prevents waste water and sewer gases from escaping the drain pipe. When the seal is compromised, you’ll notice:
- Water pooling around the base of the toilet.
- Foul odors emanating from the bathroom.
- Constant “splash” sounds after flushing.
- Visible cracks or gaps in the wax itself.
Understanding these failure modes helps you diagnose the problem early—before it escalates into a full‑blown leak that can damage subflooring and cause mold growth.
Tools and Materials You’ll Need
Before you start, gather the following items. Having everything on hand will keep the job smooth and prevent unnecessary trips back to the hardware store.
- New wax ring (standard or reinforced with a plastic horn for older flanges).
- Adjustable wrench or socket set.
- Flathead screwdriver.
- Bucket and old towels for water spillage.
- Rubber gloves and safety glasses.
- Putty knife (for removing old wax).
- Level (optional, to verify toilet alignment).
Step‑by‑Step Guide to Replacing the Wax Ring
1. Shut Off the Water Supply
Locate the shut‑off valve behind the toilet and turn it clockwise until it stops. Open the tank’s flush handle to drain any remaining water, and use a sponge or towel to soak up the last few drops.
2. Disconnect the Supply Line
Using an adjustable wrench, loosen the nut connecting the supply line to the tank. Have a bucket ready to catch any stray water that may escape.
3. Remove the Toilet
Unscrew the two closet bolts that anchor the toilet to the floor flange. Gently rock the toilet back and forth to break the wax seal, then lift it straight up. It’s heavy—consider enlisting help to avoid back injuries.
4. Clean the Flange and Old Wax
Place the toilet on a protective sheet, then use a putty knife to scrape away the old wax from the flange and the toilet’s outlet. Inspect the flange for cracks; if it’s damaged, replace it before proceeding.
5. Install the New Wax Ring
Position the new wax ring directly onto the flange, ensuring the horn (if present) points toward the wall. Some plumbers prefer to set the ring on the toilet outlet first; either method works as long as the ring is centered.
6. Re‑Seat the Toilet
Carefully lower the toilet back onto the flange, aligning the bolt holes with the closet bolts. Apply even pressure to compress the wax ring and create a uniform seal. Rock the toilet gently to seat it fully.
7. Secure the Toilet
Replace the washers and nuts on the closet bolts, tightening them alternately to keep the toilet level. Avoid over‑tightening, which can crack the porcelain.
8. Reconnect the Supply Line and Test
Re‑attach the water supply line, turn the shut‑off valve back on, and let the tank fill. Flush several times while checking around the base for any signs of leakage. If everything is dry, the job is complete.
For an even deeper dive into each of these steps—including photos and common pitfalls—check out The Ultimate DIY Guide to Replacing a Wax Ring Toilet – Stop Leaks Forever! It offers visual cues that make the process even clearer.
Tips for a Long‑Lasting Seal
- Choose the right wax ring. Older homes with low‑profile flanges benefit from a reinforced ring with a horn.
- Level the toilet. Use a level before tightening the bolts to prevent rocking, which can break the seal over time.
- Don’t reuse old wax. Even a small piece of leftover wax can compromise the new seal.
- Inspect the flange. A corroded or cracked flange often leads to recurring leaks; replace it if needed.
- Consider a wax‑free alternative. Modern rubber or silicone gaskets can be easier to install and are less messy.
Common Mistakes and How to Avoid Them

Even seasoned DIYers can slip up. Here are the most frequent errors and the quick fixes you need.
Incorrect Bolt Alignment
If the closet bolts aren’t perfectly aligned, the toilet may sit unevenly, causing the wax ring to compress unevenly. Use a wrench to adjust the bolts before the final tightening.
Over‑Tightening the Bolts
Applying too much torque can crack the toilet base and create micro‑gaps that leak. Aim for snug, not strained, connections.
Ignoring Flange Damage
A cracked or broken flange will never hold a proper seal. Replace the flange with a new PVC or ABS model before installing the new wax ring.
Skipping the Final Leak Test
Never assume the job is done without a thorough leak test. Flush the toilet multiple times and inspect the area for any dampness.
When to Call a Professional

While most homeowners can replace a wax ring with basic tools, certain situations warrant a licensed plumber:
- Persistent leaks after a replacement.
- Severe flange corrosion or rot in the subfloor.
- Complex toilet models (e.g., wall‑hung or one‑piece designs).
- Uncertainty about local plumbing codes.
In these cases, professional expertise can prevent costly water damage and ensure compliance with building standards.
Maintenance Tips to Keep Your Toilet Leak‑Free

After you’ve successfully replaced the wax ring, a few simple habits will extend the life of the seal.
- Periodically check the base for moisture after heavy flushing.
- Avoid using harsh chemicals that can degrade the wax over time.
- Inspect the water supply line for signs of wear or corrosion.
- Consider installing a tankless water heater that provides consistent pressure, reducing stress on the toilet’s sealing system.
By staying proactive, you’ll minimize the chance of surprise leaks and keep your bathroom functioning smoothly for years.
Replacing a toilet wax ring may seem intimidating at first, but with the right preparation, tools, and step‑by‑step guidance, it’s a manageable task that any competent DIY enthusiast can master. The key is to work methodically, respect the integrity of each component, and test thoroughly before calling the job complete. Armed with this knowledge, you can confidently tackle leaks, protect your flooring, and maintain a fresh, odor‑free bathroom environment.
