 Admin
AdminReplacing a toilet wax ring might sound like a niche task reserved for seasoned plumbers, but the truth is that any competent homeowner can master it with the right guidance. The wax ring is the unsung hero that creates a watertight seal between the toilet base and the waste pipe; when it fails, water seeps out, odors linger, and the whole bathroom can quickly turn into a disaster zone. By tackling the wax ring replacement yourself, you save money, avoid the inconvenience of a flooded floor, and gain confidence in handling basic plumbing repairs.
In this comprehensive tutorial, we’ll walk you through everything you need to know—from gathering the proper tools, removing the old ring, and installing a new one, to troubleshooting common pitfalls and knowing when to call in a professional. Whether you’re dealing with a slow drip or a full‑blown leak, the steps outlined here will give you the authority to fix the problem quickly and correctly.
Before we dive into the details, remember that safety always comes first. Shut off the water supply, wear gloves, and keep a bucket handy for any unexpected spills. With those precautions in place, let’s explore the process that will keep your toilet sealed tight for years to come.
Tools and Materials You’ll Need
Essential Tools
- Adjustable wrench or flange wrench – for disconnecting the water supply line and removing the toilet bolts.
- Flat‑head screwdriver – to pry off the old wax ring remnants.
- Putty knife – useful for scraping away stubborn wax.
- Rubber gloves – to keep your hands clean and protected.
- Bucket or large bowl – to catch any residual water when you disconnect the supply line.
Materials to Purchase
- Wax ring – standard size, but consider a reinforced wax‑gasket or a wax‑free silicone ring for added durability.
- New toilet bolts and caps (optional) – replacing corroded hardware can improve stability.
- Plumber’s putty or silicone caulk – for sealing the base after installation, if desired.
Having everything on hand before you start will keep the workflow smooth and prevent unnecessary trips to the hardware store. If you’re uncertain about the exact size of the wax ring you need, measure the distance between the floor and the flange opening, then check the packaging for compatibility.
Step‑By‑Step Guide to Removing the Old Wax Ring

1. Shut Off the Water Supply
Locate the shut‑off valve behind the toilet (usually a small knob or lever) and turn it clockwise until it stops. Open the toilet tank lid and flush the toilet to drain as much water as possible. Use the bucket to soak up any remaining water in the tank and bowl.
2. Disconnect the Supply Line
Using the adjustable wrench, loosen the nut that connects the supply line to the bottom of the tank. Once loose, gently pull the line away and set it aside. Keep the bucket underneath to catch any residual water that may leak out.
3. Remove the Toilet
Locate the two (or sometimes three) bolts that secure the toilet to the floor flange. Unscrew the nuts with the wrench, then gently rock the toilet back and forth to break the seal. Lift the toilet straight up—avoid tilting it, as this can crack the porcelain. Place the unit on a protective surface like a blanket or cardboard.
4. Scrape Off the Old Wax
With the flat‑head screwdriver and putty knife, carefully scrape away the old wax from both the toilet outlet (the horn) and the flange. Remove all remnants; any leftover wax can interfere with the new seal. This is a good moment to inspect the flange for cracks or corrosion. If the flange is damaged, replace it before proceeding.
5. Clean the Area
Wipe the floor around the flange with a damp cloth to remove dust and debris. Let the area dry completely. A clean surface ensures the new wax ring will sit evenly and create a reliable seal.
Installing the New Wax Ring Correctly
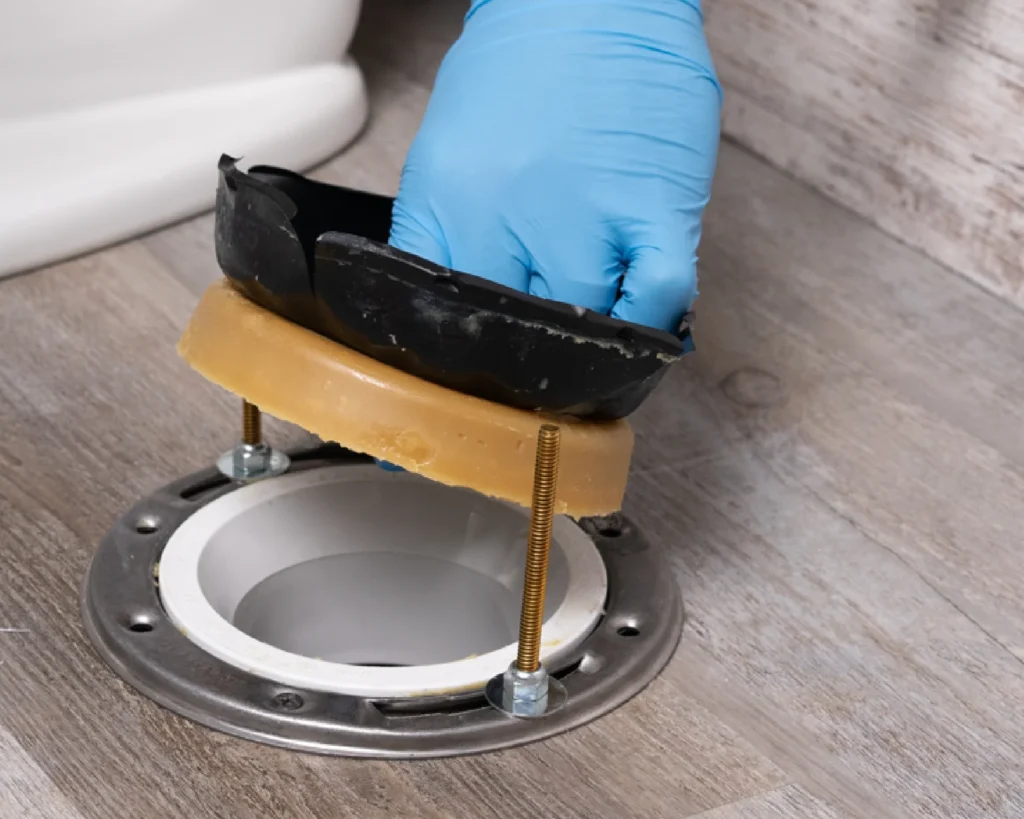
1. Position the New Wax Ring
Place the new wax ring directly onto the flange, ensuring the tapered side (if present) faces upward toward the toilet. Some installers prefer to set the ring on the toilet’s horn instead; either method works as long as the ring is centered and not twisted.
2. Set the Toilet Back in Place
Lower the toilet carefully onto the flange, aligning the bolt holes in the base with the floor bolts. Press down firmly and evenly, allowing the weight of the toilet to compress the wax ring and create a seal. You may hear a faint “squish” sound—that’s the wax conforming to the surfaces.
3. Secure the Toilet
Replace the washers and nuts on the floor bolts. Tighten them evenly, alternating sides to avoid cracking the porcelain. Do not overtighten; a snug fit is sufficient.
4. Reconnect the Water Supply
Reattach the supply line to the tank inlet, tighten the nut, and turn the shut‑off valve back on. Allow the tank to fill, then flush a few times to check for leaks around the base and at the supply connection.
5. Final Seal (Optional)
If you prefer an extra barrier against moisture, run a bead of plumber’s putty or silicone caulk around the base of the toilet. Smooth it with a fingertip and let it cure according to the manufacturer’s instructions.
Common Mistakes and How to Avoid Them

Improper Wax Ring Placement
- Placing the ring off‑center or allowing it to fold can create gaps. Double‑check alignment before lowering the toilet.
Over‑Tightening the Bolts
- Excessive pressure can crack the porcelain or warp the flange. Tighten until the toilet feels stable, then stop.
Ignoring Flange Damage
- A cracked or corroded flange undermines the seal regardless of how perfect the wax ring is. Replace a compromised flange to ensure long‑term integrity.
Using the Wrong Size Wax Ring
- Standard rings work for most residential toilets, but larger or irregularly shaped bases require custom sizes. Measure the distance from the floor to the outlet and select accordingly.
Skipping the Final Leak Test
- After reinstalling, always flush the toilet several times and inspect for water around the base. Early detection saves you from hidden damage.
When to Call a Professional
Severe Flange Corrosion or Cracks
If the flange is rusted through or broken, a professional may need to replace it with a new PVC or cast‑iron model, which often requires cutting into the floor.
Repeated Leaks After Multiple Replacements
Recurring issues may indicate underlying problems such as a cracked toilet bowl, misaligned drain pipe, or venting issues that need expert diagnosis.
Complex Bathroom Layouts
Older homes with unconventional flange placements or limited clearance under the toilet can make DIY replacement tricky. An experienced plumber can navigate these constraints safely.
For a deeper dive into the DIY aspects of this repair, you may find the article Replace Wax Ring on Toilet – The Ultimate DIY Fix Every Homeowner Needs incredibly helpful. It expands on troubleshooting tips and offers additional product recommendations.
Additionally, understanding related home systems can make your repair smoother. For instance, Understanding the Basics of a 110 Volt Water Heater provides insight into how water temperature and pressure affect toilet performance.
By following the steps outlined above, you’ll replace the wax ring with confidence and prevent future leaks. A well‑sealed toilet not only protects your flooring but also enhances the overall hygiene of your bathroom. Remember, preparation is key: gather your tools, work methodically, and test thoroughly before you consider the job complete.
Taking on this repair yourself can be incredibly rewarding. Not only do you avoid the cost of a service call, but you also gain valuable knowledge that will serve you in future home improvement projects. So, the next time you notice a faint trickle or a foul smell around your toilet, you’ll know exactly what to do: shut off the water, replace that wax ring, and restore your bathroom to a leak‑free state.