 Admin
AdminReplacing a toilet wax ring might sound like a job for a professional plumber, but with the right preparation and a clear understanding of the process, most homeowners can tackle it confidently. A faulty wax ring is the hidden culprit behind leaks, foul odors, and even water damage that can spread far beyond the bathroom floor. By mastering the Toilet Wax Ring Install technique, you not only protect your home’s structural integrity but also save money on costly service calls.
The key to a successful installation lies in paying attention to the details that many DIY guides overlook: the type of wax ring you choose, the condition of the toilet flange, and the proper torque when tightening the bolts. In this article we’ll walk you through every step, from gathering tools to testing the seal, so you can feel certain that the job is done right the first time.
Before diving into the actual work, it’s worth understanding why the wax ring matters. This seemingly simple donut‑shaped component creates a watertight barrier between the toilet’s base and the waste pipe. When it fails, water can seep out during flushing, leading to slippery floors, mold growth, and structural rot. By learning how to perform a Toilet Wax Ring Install correctly, you eliminate these risks and restore your bathroom to a dry, hygienic state.
Essential Tools and Materials for a Toilet Wax Ring Install
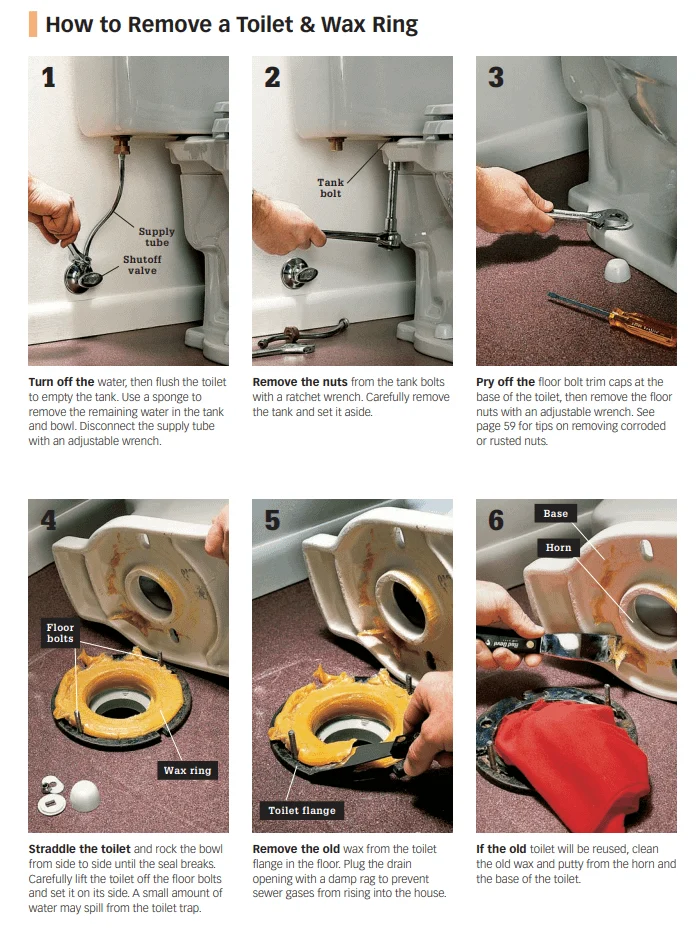
- New wax ring (standard or reinforced with a plastic funnel)
- Adjustable wrench or socket set
- Flat‑head screwdriver
- Putty knife
- Rubber gloves and safety glasses
- Old towels or rags
- Bucket (to catch any residual water)
- Level (optional, for final alignment check)
Choosing the right wax ring is more nuanced than it appears. Standard wax rings work well for most installations, but if your toilet sits higher than usual or the flange is slightly damaged, a reinforced ring with a rubber or silicone core provides added stability. Some professionals even recommend a wax‑free silicone seal for modern, low‑flow toilets, though the classic wax ring remains the most reliable and widely used option.
Step‑by‑Step Toilet Wax Ring Install Process
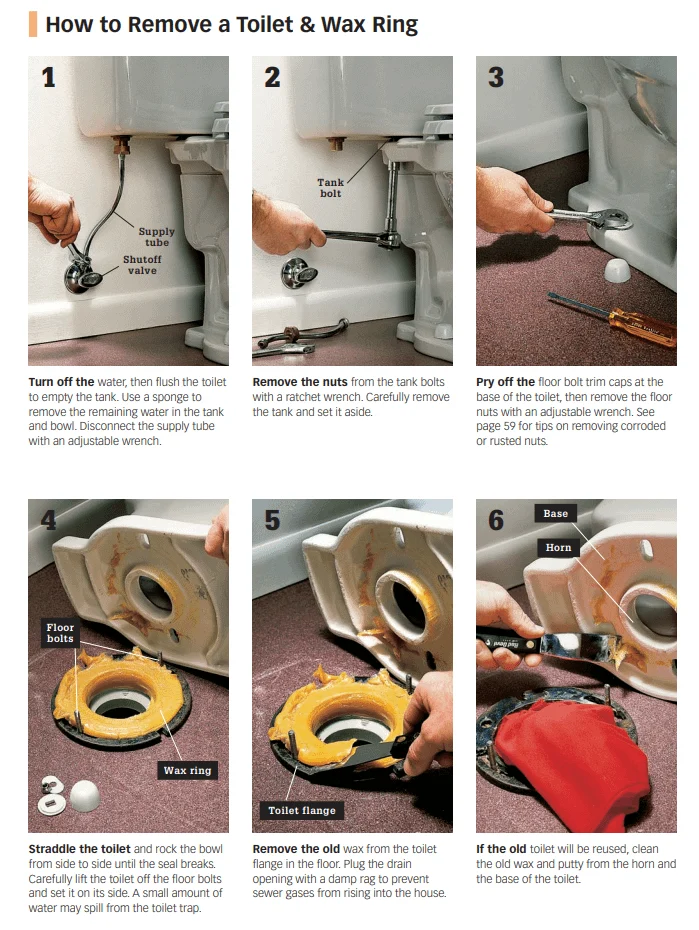
Step 1: Shut Off Water and Empty the Tank
Locate the shut‑off valve behind the toilet and turn it clockwise until it stops. Flush the toilet a few times to drain as much water as possible from the tank and bowl. Use a sponge or towel to soak up any remaining water in the tank, then place a bucket underneath the supply line to catch drips when you disconnect it.
Step 2: Disconnect the Water Supply Line
Using an adjustable wrench, loosen the nut that secures the supply line to the bottom of the tank. Carefully pull the line away, ensuring you have a rag ready to wipe any water that may spill. This step gives you clear access to the bolts that hold the toilet to the floor.
Step 3: Remove the Toilet
Locate the two (or sometimes three) closet bolts that fasten the toilet base to the floor flange. Loosen the nuts with a wrench, but do not remove them completely—leaving them in place helps support the toilet as you lift it. Gently rock the toilet back and forth to break the seal, then lift it straight up. Place the heavy unit on an old blanket or cardboard to protect your floor.
Step 4: Inspect and Clean the Flange
With the toilet removed, you’ll see the closet flange—a metal or PVC ring that sits in the waste pipe opening. Check for cracks, corrosion, or any movement. If the flange is damaged, replace it before proceeding; a compromised flange will cause future leaks regardless of how well you install the wax ring. Use a putty knife to scrape away the old wax residue, and clean the area with a damp rag.
Step 5: Install the New Wax Ring
Place the new wax ring directly onto the flange, centering it over the drain opening. For a reinforced ring with a funnel, align the funnel so it points upward toward the toilet’s outlet. Some installers prefer to set the wax ring on the bottom of the toilet instead—both methods work, but the flange‑first approach reduces the chance of misalignment.
Step 6: Re‑seat the Toilet
Carefully lower the toilet onto the wax ring, aligning the bolt holes with the closet bolts. Apply gentle pressure, then rock the unit slightly to ensure the wax ring spreads evenly and creates a full seal. Once seated, press down firmly for about 30 seconds to compress the wax.
Step 7: Secure the Toilet to the Floor
Replace the washers and nuts on the closet bolts, tightening them alternately to keep the load even. Use a torque of about 15‑20 Nm (or a snug hand‑tightened feel) – overtightening can crack the porcelain. After the bolts are snug, attach any decorative caps.
Step 8: Reconnect Water Supply and Test
Reconnect the supply line to the tank, hand‑tighten the nut, then give it a final quarter turn with the wrench. Turn the shut‑off valve counter‑clockwise to restore water flow. Allow the tank to fill, then flush the toilet several times, watching closely around the base for any signs of leakage.
Common Mistakes to Avoid During a Toilet Wax Ring Install
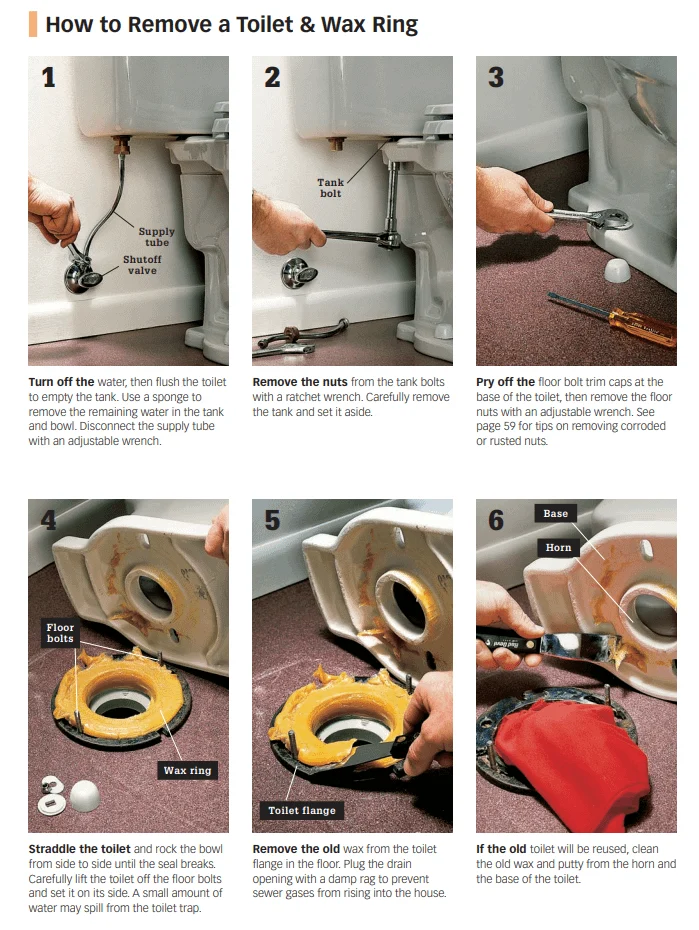
- Using the wrong wax ring size: Measure the distance from the floor to the bottom of the toilet bowl; oversized rings can cause bulging, while undersized rings won’t seal properly.
- Neglecting flange health: A cracked or corroded flange will leak even with a perfect wax ring install.
- Over‑tightening the bolts: Excessive pressure can crack the porcelain or distort the wax ring, creating gaps.
- Improper alignment: Shifting the toilet after the wax ring contacts the flange can break the seal.
- Skipping the final leak test: Always flush multiple times and inspect the base; a tiny drip can become a major problem later.
Tips for a Long‑Lasting Seal
Choose a Reinforced Wax Ring for High‑Traffic Bathrooms
If your household has frequent toilet use, a reinforced wax ring with a plastic or rubber core adds durability. The extra material helps absorb movement caused by floor vibrations, reducing the likelihood of the seal breaking over time.
Consider Wax‑Free Silicone Seals in Moisture‑Prone Areas
In basements or bathrooms with high humidity, a silicone seal can outperform traditional wax by remaining flexible and resisting mold growth. However, ensure the silicone product is rated for toilet installations, as not all are suitable.
Maintain Proper Toilet Height
When installing a new toilet or replacing a wax ring, check that the toilet sits level and at the appropriate height. An uneven toilet can cause stress on the flange and wax ring, leading to premature failure. Use a level across the tank and bowl to verify alignment before tightening the bolts fully.
When to Call a Professional
Even the most seasoned DIY enthusiast may encounter situations where professional help is wise. If you discover a severely corroded metal flange, extensive water damage, or a cracked toilet bowl, a licensed plumber can replace the flange, repair the subfloor, or recommend a full toilet replacement. Additionally, if you’re uncomfortable working in tight spaces or lack the necessary tools, hiring a pro saves time and prevents costly errors.
Additional Resources for Bathroom Maintenance

For a broader perspective on maintaining a leak‑free bathroom, our step‑by‑step guide on how to put a wax ring on a toilet offers visual aids and troubleshooting tips that complement the information presented here. Pairing this knowledge with routine inspections of other fixtures—like the Best 110 Volt Tankless Water Heater Guide—helps keep your entire plumbing system in top condition.
By following the detailed steps outlined above, you can confidently perform a Toilet Wax Ring Install that stands the test of time. The process may involve lifting a heavy fixture and working in a confined space, but the payoff—dry floors, fresh odors, and peace of mind—is well worth the effort. Remember, preparation, precision, and patience are the three pillars of a successful installation. Once you’ve sealed the wax ring and confirmed a leak‑free operation, you’ll have earned a valuable skill that will serve you and future homeowners alike.